Dive into the vibrant world of Tex-Mex with my fresh and flavorful Tex-Mex Layered Dip! This colorful dish layers zesty beans, creamy guacamole, and tangy salsa for a dip that wows at every party. Whether you’re hosting game night or a casual gathering, this dip is sure to be a hit. Grab your tortilla chips, and let’s layer up a delightful treat that everyone will love!
Why I Love This Recipe
- Colorful Presentation: This layered dip is visually stunning, showcasing vibrant colors that are sure to impress your guests.
- Easy to Make: With just a few simple ingredients and straightforward steps, this recipe can be whipped up in no time.
- Customizable Flavors: You can easily adjust the layers to include your favorite ingredients, making it a versatile dish for any palate.
- Perfect for Parties: This dip is a crowd-pleaser and perfect for gatherings, allowing everyone to dig in with their favorite tortilla chips.
Ingredients
List of Key Ingredients
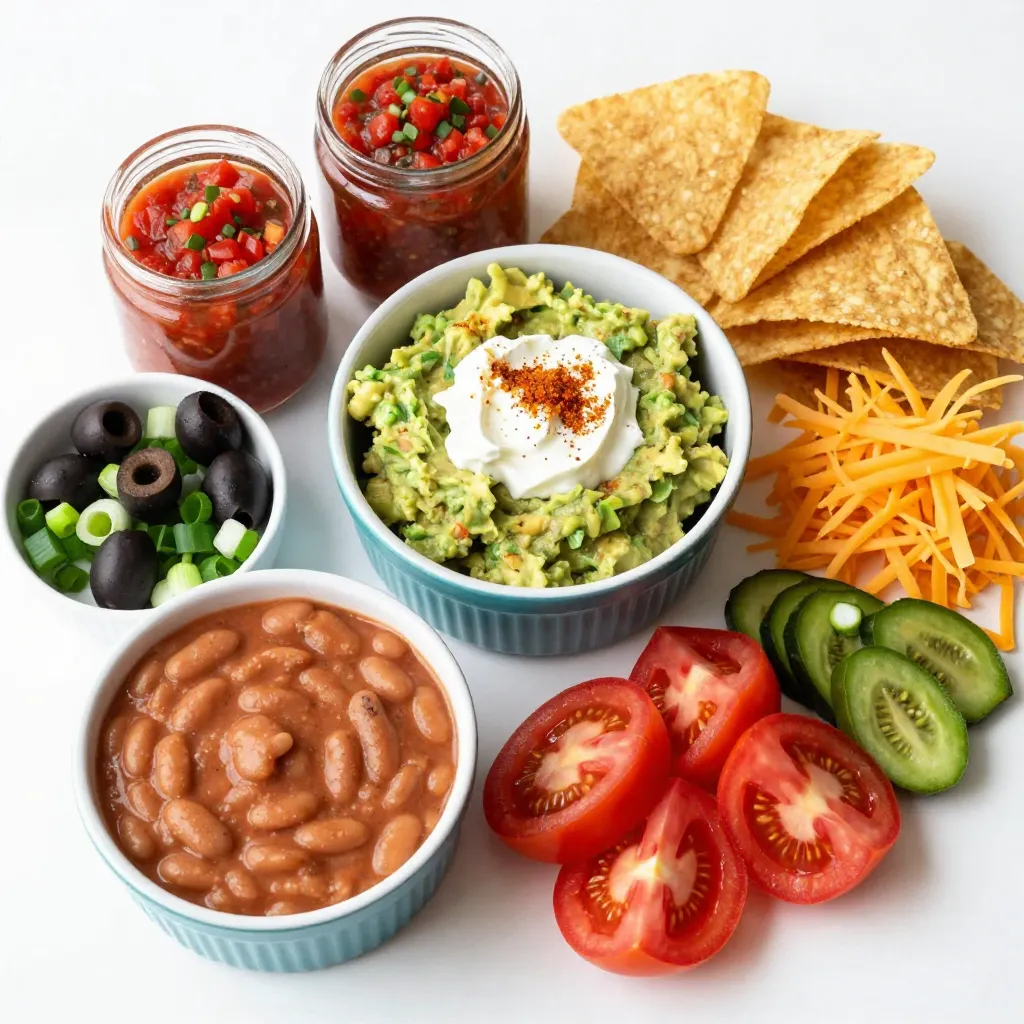
– 1 cup refried beans
– 1 cup creamy guacamole
– 1 cup sour cream
– 1 cup chunky salsa
– 1 cup sharp shredded cheddar cheese
– 1/2 cup sliced black olives
– 1/2 cup finely chopped green onions
– 1/2 cup diced ripe tomatoes
– 1 teaspoon zesty taco seasoning
– Tortilla chips (for serving)
Optional Ingredients
– Additional toppings like jalapeños or cilantro
– Different types of beans (black beans, pinto beans)
– Variation in cheese (Monterey Jack, pepper jack)
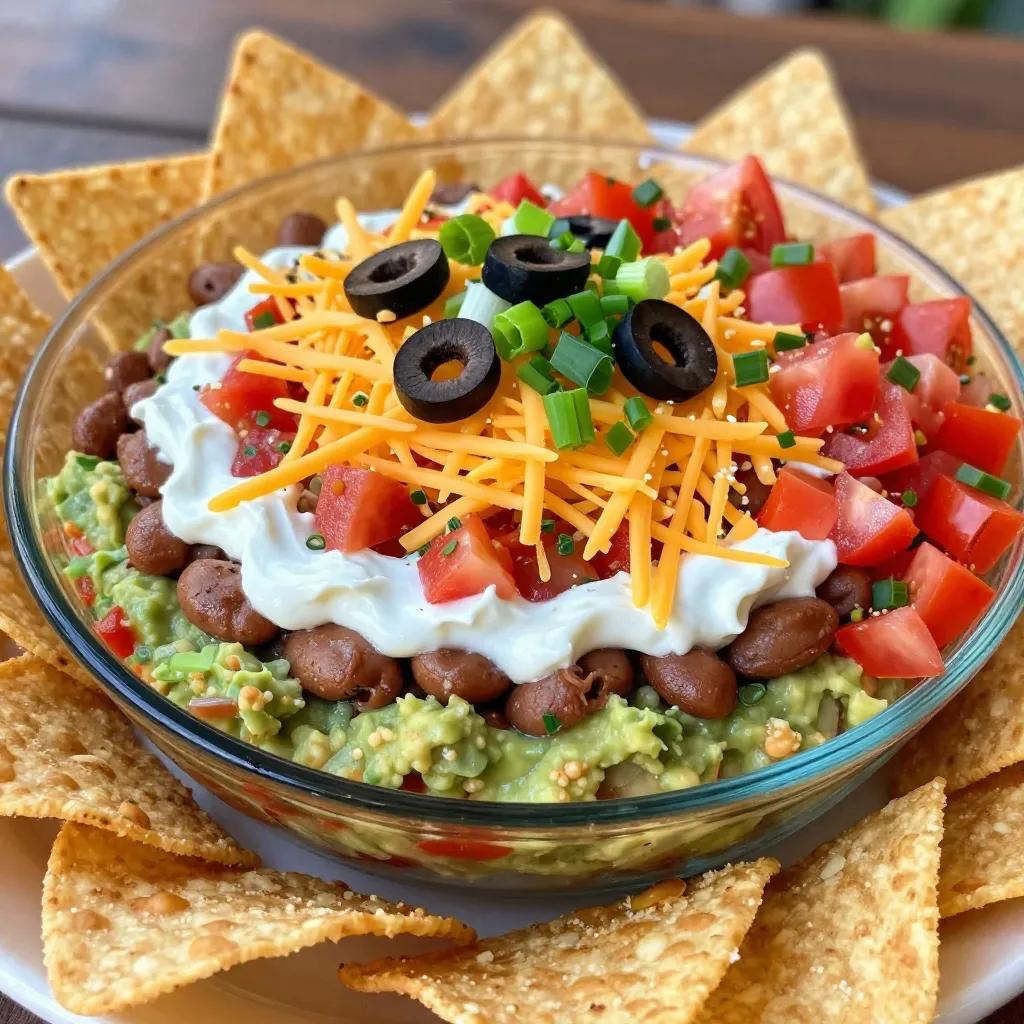
The key ingredients create a colorful and tasty dip. Start with refried beans for a creamy base. The guacamole adds a rich flavor, while the sour cream offers a cool contrast. Salsa brings a zesty kick. Sharp cheddar cheese adds a delightful cheesiness.
You can personalize the dip with black olives and green onions for crunch. Fresh tomatoes on top add color and freshness. Feel free to explore optional ingredients. Jalapeños add heat if you like spice. Using different beans or cheeses allows you to make the dip your own.
This dip is not just easy to make but also fun to customize. Get creative and enjoy!
Step-by-Step Instructions
Preparing the Layers
– Step 1: Start by spreading 1 cup of refried beans in the bottom of your dish. Use a clear glass dish to show off those layers.
– Step 2: Next, gently add 1 cup of creamy guacamole on top of the beans. Smooth it out with a spoon for an even layer.
– Step 3: In a small bowl, mix 1 cup of sour cream with 1 teaspoon of taco seasoning. Stir until it’s well combined. Carefully spread this mixture over the guacamole.
Finishing Touches
– Step 4: Pour 1 cup of your favorite chunky salsa over the sour cream. Make sure it covers everything nicely.
– Step 5: Now, generously add 1 cup of sharp shredded cheddar cheese on top of the salsa. This adds a nice cheesy flavor.
– Step 6: For a pop of color, sprinkle 1/2 cup of sliced black olives, 1/2 cup of finely chopped green onions, and 1/2 cup of diced ripe tomatoes on the cheese.
Cooling Time
– Step 7: Cover the dip with plastic wrap and refrigerate for at least 30 minutes. This helps the flavors blend together and makes it taste even better.
Tips & Tricks
Best Practices for Layering
– Use a clear dish for presentation. This makes the layers pop.
– Ensure even spreading of each layer. This keeps the dip neat and tasty.
Enhancing Flavor
– Use freshly made guacamole. It adds great taste and freshness.
– Customize taco seasoning to taste. This lets you control the spice level.
Serving Suggestions
– Arrange tortilla chips creatively. This makes your dip look fun and inviting.
– Garnish with extra toppings like green onions. They add color and crunch.
Pro Tips
- Layering Technique: Make sure to spread each layer evenly to create a beautiful presentation. Use the back of a spoon or a spatula for smooth results.
- Flavor Boost: For an extra kick, try adding jalapeños or diced green chilies to the salsa layer. This will enhance the flavor profile of your dip.
- Chill Time: Refrigerating the dip for at least 30 minutes allows the flavors to meld together, resulting in a more delicious and cohesive taste.
- Serving Suggestion: Serve with a variety of tortilla chips, such as blue corn or flavored chips, to add a unique twist to your dip experience.
Variations
Healthy Alternatives
You can make this dip a bit lighter. Use low-fat sour cream or Greek yogurt instead of regular sour cream. Both options taste great and cut down on fat. For a fresh twist, try homemade guacamole. Use ripe avocados, lime juice, and fresh herbs. This will add flavor and nutrition.
Dietary Modifications
If you need gluten-free options, look for gluten-free tortilla chips. Many brands offer tasty choices that fit your needs. For those who follow a vegan diet, swap the sour cream for a plant-based alternative. You can also use a vegan cheese substitute or skip the cheese entirely. This dip can be just as tasty without dairy.
Flavor Profile Changes
Want more kick? Use a spicier salsa or add sliced jalapeños. This will give your dip a zesty punch. You can also change up the beans. Instead of refried beans, try black beans or pinto beans. Each type adds its own unique flavor and texture.
Storage Info
Refrigeration Guidelines
To store leftovers, place your dip in an airtight container. Cover it well to keep out air and moisture. This way, the dip stays fresh for longer. The shelf life in the fridge is about three days. After that, the flavors may fade.
Freezing Instructions
You can freeze Tex-Mex Layered Dip, but it changes the texture. If you want to freeze it, layer the dip without the guacamole and sour cream. These ingredients don’t freeze well. For best results, use a freezer-safe container. When you want to eat it, thaw in the fridge overnight. Then, add the fresh guacamole and sour cream just before serving.
Reheating Tips
Reheat ingredients separately when you want to enjoy leftovers. This keeps the flavors bright. To avoid sogginess, do not heat the whole dip at once. Instead, warm the beans and salsa in a pan. Keep the cheese and fresh toppings cold until serving.
FAQs
What can I serve with Tex-Mex Layered Dip?
You can serve this dip with many snacks. Here are a few ideas:
– Fresh veggies like carrots, cucumbers, or bell peppers
– Crunchy tortilla chips
– Crispy pita chips
– Soft flour tortillas or corn tortillas
– Crackers for a different twist
These pairings add texture and make your dip even more fun!
How long can Tex-Mex Layered Dip sit out?
When serving Tex-Mex Layered Dip at a party, remember food safety. It can sit out for about two hours. If it’s a hot day, cut that time to one hour. Bacteria grow quickly in warm temps. Keep your dip fresh and safe!
Can I make this dip in advance?
Yes, you can make Tex-Mex Layered Dip ahead of time. It saves you time when guests arrive! Prepare the dip and cover it. Chill it in the fridge for at least 30 minutes before serving. This lets the flavors blend together nicely. Just remember to add fresh toppings like tomatoes right before serving. Enjoy!
In this article, we explored how to make a delicious Tex-Mex Layered Dip. We covered key ingredients, preparation steps, and variations to enhance flavor. I shared best practices for layering and tips for storing leftovers. Don’t forget, you can customize the recipe to suit your tastes. Use fresh ingredients and creative garnishes for the best results. This dip is perfect for any gathering and can easily be made ahead. Enjoy your tasty creation and impress your friend