Get ready to treat yourself with my Raspberry White Chocolate Scones! These fluffy scones are the perfect blend of tart raspberries and sweet white chocolate. In this recipe, I’ll guide you step-by-step to create this delightful treat that pairs perfectly with your morning coffee or afternoon tea. Whether you’re a baking novice or a pro, these scones will impress everyone at your table. Let’s bake something delicious together!
Why I Love This Recipe
- Delicious Flavor Combination: The sweet and tart of fresh raspberries paired with creamy white chocolate creates a delightful explosion of taste in every bite.
- Quick and Easy: With just 15 minutes of prep time, these scones are perfect for a last-minute breakfast or brunch treat.
- Perfect Texture: The scones are soft and flaky, making them a comforting choice for any time of day, especially when served warm.
- Versatile Ingredients: This recipe allows for substitutions, so you can easily use frozen raspberries or switch out white chocolate for another favorite mix-in.
Ingredients
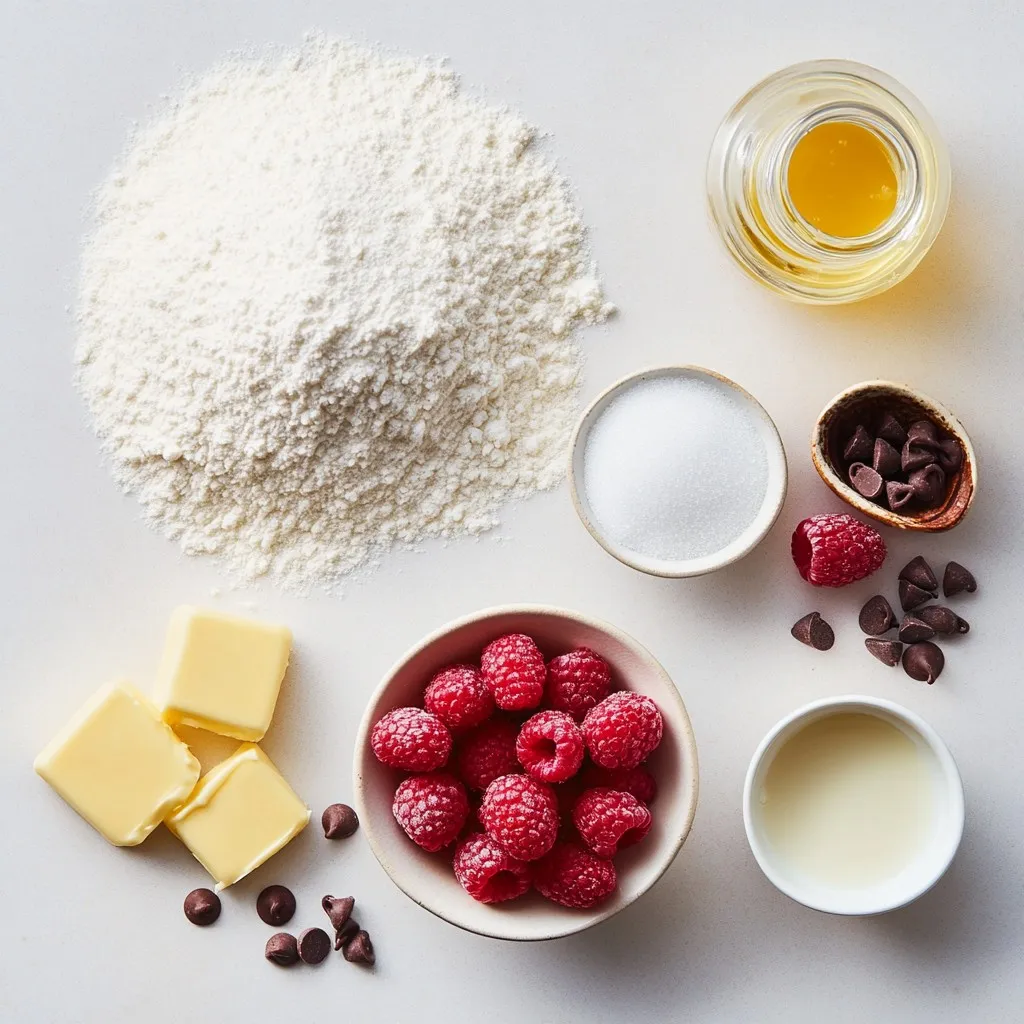
Making Raspberry White Chocolate Scones is simple. Having the right ingredients is key. Here’s what you need:
– 2 cups all-purpose flour
– 1/2 cup granulated sugar
– 1 tablespoon baking powder
– 1/2 teaspoon salt
– 1/4 cup unsalted butter, cold and cubed
– 1/2 cup heavy cream
– 1 large egg
– 1 teaspoon vanilla extract
– 1 cup fresh raspberries (or frozen, if fresh are unavailable)
– 1/2 cup white chocolate chips
– 1 egg wash (1 egg beaten with a splash of water)
Each ingredient has a role. The flour gives structure, while sugar adds sweetness. Baking powder helps the scones rise. Salt brings out flavors. Cold butter makes them flaky. Heavy cream adds richness. The egg binds everything. Vanilla gives a nice flavor boost. Raspberries and white chocolate add bursts of taste. Finally, the egg wash helps with that golden color.
You can use fresh or frozen raspberries. If you use frozen, do not thaw them. This keeps the scones from getting mushy.
Step-by-Step Instructions
Preparation Steps
– Preheat the oven and prepare baking sheet
Start by setting your oven to 400°F (200°C). Line a baking sheet with parchment paper to keep the scones from sticking.
– Combine dry ingredients and incorporate butter
In a large bowl, mix 2 cups of all-purpose flour, 1/2 cup of granulated sugar, 1 tablespoon of baking powder, and 1/2 teaspoon of salt. Whisk these dry ingredients until they blend well. Next, add 1/4 cup of cold, cubed unsalted butter. Use a pastry cutter or your fingers to mix until it looks like coarse crumbs.
– Mix cream, egg, and vanilla; combine with dry ingredients
In another bowl, whisk together 1/2 cup of heavy cream, 1 large egg, and 1 teaspoon of vanilla extract until smooth. Slowly pour this mix into the flour mix, stirring gently with a spatula. Be careful not to overmix.
– Fold in raspberries and white chocolate chips
Now, gently fold in 1 cup of fresh raspberries and 1/2 cup of white chocolate chips. Aim to mix them in without crushing the raspberries.
– Shape, cut, and transfer scones to baking sheet
Lightly flour a clean surface and turn the dough out onto it. Knead it gently until the dough sticks together. Shape it into a round disc that is about 1 inch thick. Use a sharp knife to cut this disc into 8 wedges. Carefully move each wedge to your prepared baking sheet.
– Brush with egg wash and bake
Beat 1 egg with a splash of water to make an egg wash. Brush this wash over the tops of the scones to create a golden crust. Bake the scones for 15-18 minutes. They are done when the tops turn golden brown and a toothpick comes out clean.
Tips & Tricks
Perfecting Your Scones
To make the best scones, focus on the dough consistency. You want a soft and slightly sticky dough. This helps the scones rise well. If the dough is too dry, add a bit more cream. If it’s too wet, sprinkle in a bit more flour.
Cold butter is key. It creates flaky layers in your scones. Cut the butter into small cubes and keep it in the fridge until you are ready to use it. When you mix it into the flour, do it quickly. This keeps the butter cold and helps the scones rise.
Avoid overmixing the dough. Mix just until the ingredients come together. Overmixing can make your scones tough. Be gentle when folding in the raspberries and white chocolate chips. You want to keep the raspberries whole for bursts of flavor in every bite.
Serving Suggestions
For a lovely presentation, serve your scones on a rustic wooden board. Dust them lightly with powdered sugar. Add a small bowl of fresh raspberries nearby for a pop of color. This makes your dish look inviting and tasty.
Pair these scones with a cup of coffee or tea. A strong black coffee complements the sweetness of the scones. If you prefer tea, try a light herbal blend. It will enhance the fruity flavors of the raspberries. Enjoy these treats warm for the best experience!
Pro Tips
- Use Cold Ingredients: Ensure that your butter and cream are cold. This helps create the flaky texture that scones are known for.
- Don’t Overmix: When combining wet and dry ingredients, mix just until incorporated. Overmixing can lead to tough scones.
- Chill the Dough: For even better results, chill the shaped scones in the fridge for 15-30 minutes before baking. This helps maintain their shape.
- Experiment with Flavors: Feel free to add lemon zest or almond extract for a unique twist on the classic raspberry and white chocolate combination.
Variations
Flavor Adjustments
You can switch out raspberries for other berries. Blackberries, blueberries, or strawberries work well. Each berry brings a unique taste. Try dark chocolate instead of white. Dark chocolate adds a rich flavor that pairs nicely with berries. Milk chocolate also offers a sweeter option. Mixing and matching berries and chocolates can create fun new flavors.
Dietary Modifications
To make scones gluten-free, use a gluten-free flour blend. Look for a mix that has xanthan gum for better texture. This helps the scones rise and stay fluffy. For a dairy-free option, use coconut cream instead of heavy cream. You can also use non-dairy butter. This way, everyone can enjoy these tasty treats. Adjusting flavors and ingredients keeps this recipe fresh and exciting.
Storage Info
Best Storage Practices
To keep your Raspberry White Chocolate Scones fresh, store them in an airtight container. This helps maintain their soft texture and keeps them from drying out. If you want to enjoy them later, you can freeze the scones. Wrap each scone in plastic wrap, then place them in a freezer bag. They will stay fresh for up to three months. When you want to eat them, just pull them out and let them thaw at room temperature.
Reheating Instructions
When it comes to reheating your scones, there are a few methods. You can use the oven for the best results. Preheat your oven to 350°F (175°C). Place the scones on a baking sheet and heat for about 5 to 10 minutes. This will make them warm and soft again. If you’re in a hurry, you can use the microwave. Heat each scone for about 15 to 20 seconds. This method is quick but may not keep them as crispy. Choose the method that works best for you!
FAQs
Common Questions
How do I achieve fluffy scones?
To make fluffy scones, use cold butter and avoid overmixing. Cold butter creates steam, which helps the scones rise. Mix the dough until just combined.
Can I use frozen raspberries instead of fresh?
Yes, you can use frozen raspberries. They work well in this recipe. Just toss them in the flour mixture to prevent them from breaking apart.
How long do Raspberry White Chocolate Scones last?
These scones last about 2-3 days at room temperature. Store them in an airtight container to keep them fresh.
Can I make the dough ahead of time?
You can make the dough ahead of time. Shape it and wrap it tightly, then keep it in the fridge for up to 24 hours. When ready, just bake as directed.
Making delicious Raspberry White Chocolate Scones is simple and fun. We covered the key ingredients, preparation steps, and crucial tips to get it right. Remember to use cold butter for that perfect texture and to fold in flavors gently. You can also try variations, such as gluten-free or dairy-free options. Store your scones properly to enjoy them later. With these straightforward steps, you can impress friends and family with your baking skills. Enjoy every bite of your freshly baked scone