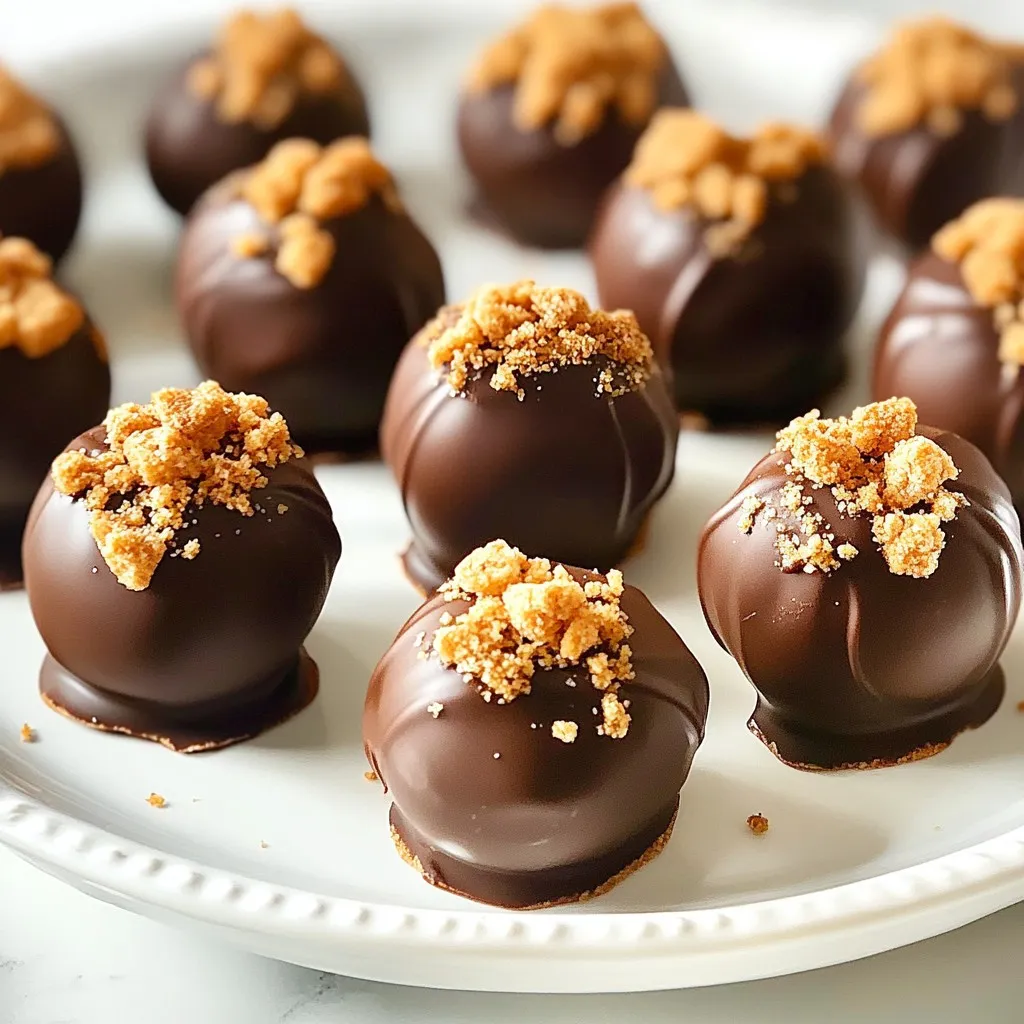
Get ready to impress your friends and family with No-Bake Gingerbread Truffles! These sweet treats combine simple ingredients to capture the joy of the holiday season. With just a few steps, you can create creamy, spiced truffles that are perfect for any festive gathering. In this post, I’ll walk you through everything you need to know to make these delightful treats, including tips, variations, and storage ideas. Let’s dive in!
Why I Love This Recipe
- Festive Flavor: The combination of gingerbread spices creates a warm and inviting flavor that perfectly captures the essence of the holiday season.
- No-Bake Convenience: These truffles are simple to make and require no baking, making them a quick and easy treat for any holiday gathering.
- Customizable Coating: Dip them in dark or milk chocolate, and roll them in extra crushed gingerbread for a personal touch that will impress your guests.
- Perfect for Gifting: These delightful truffles are great for packaging as gifts, bringing joy and sweetness to friends and family during the holidays.
Ingredients
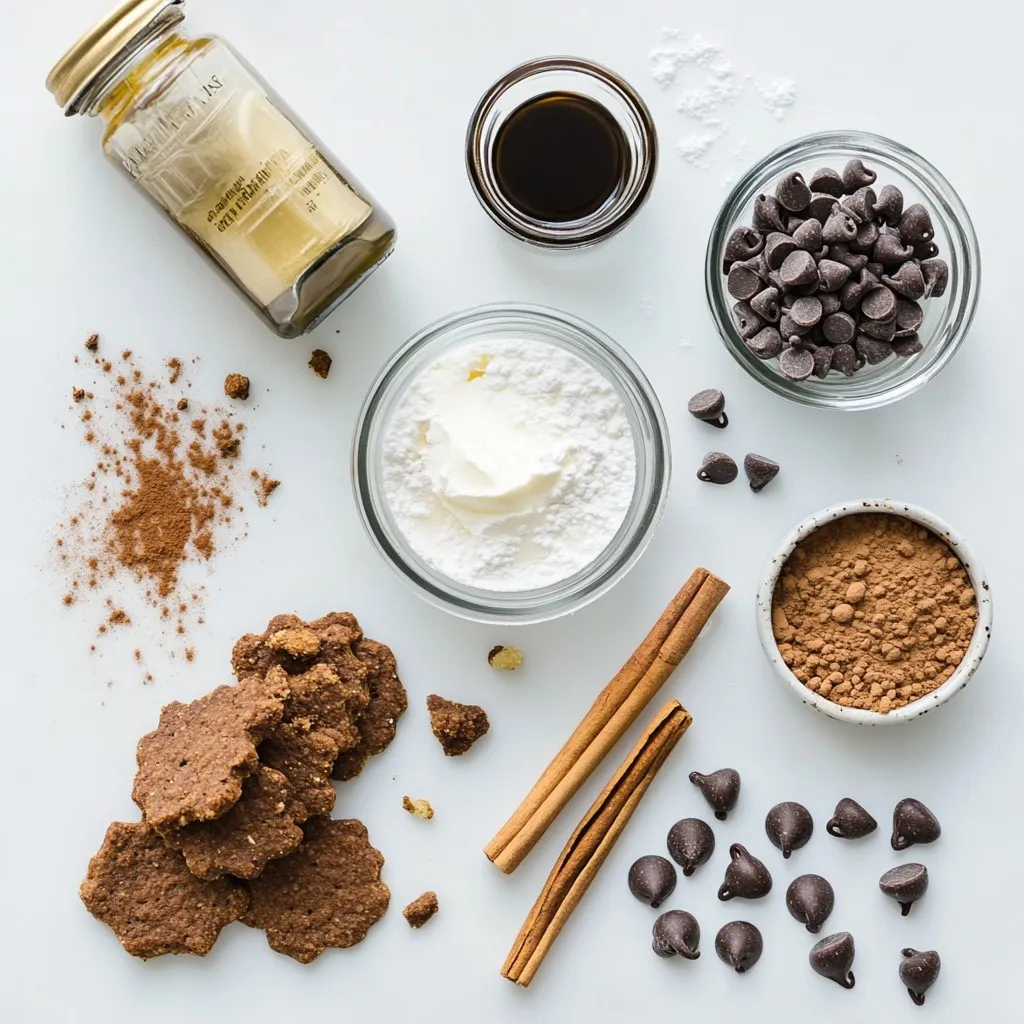
Main Ingredients for No-Bake Gingerbread Truffles
– 1 cup gingerbread cookies, finely crushed
– 1/2 cup cream cheese, softened
– 1/4 cup powdered sugar
The main ingredients create a rich and flavorful base for these truffles. The gingerbread cookies give a warm spice flavor. Cream cheese adds creaminess, while powdered sugar brings sweetness. Together, they make a delightful mix.
Spices and Flavorings
– 1 teaspoon ground ginger
– 1 teaspoon ground cinnamon
– 1/4 teaspoon ground nutmeg
– 1/2 teaspoon pure vanilla extract
Spices play a big role in these truffles. Ground ginger adds a bold kick. Cinnamon brings warmth, and nutmeg adds a hint of earthiness. The vanilla extract ties it all together, enhancing the overall flavor.
Coating Ingredients
– 1/2 cup chocolate chips (dark or milk chocolate)
– 1 tablespoon coconut oil
– Additional crushed gingerbread cookies for rolling (optional)
The coating is where the magic happens. Melted chocolate chips create a smooth shell. Adding coconut oil makes the chocolate shiny and easy to work with. You can roll the truffles in extra crushed cookies for a festive touch.
Step-by-Step Instructions
Preparing the Dough
To start, you need to combine gingerbread cookies and cream cheese. In a medium bowl, mix 1 cup of finely crushed gingerbread cookies with 1/2 cup of softened cream cheese. Use a spatula or your hands to blend well. Next, add 1/4 cup of powdered sugar, 1 teaspoon of ground ginger, 1 teaspoon of ground cinnamon, 1/4 teaspoon of ground nutmeg, and 1/2 teaspoon of vanilla extract. Mix until smooth. Ensure there are no dry bits left in the dough.
Chilling the Mixture
Chilling is very important for easier rolling. Once your dough is mixed, cover the bowl with plastic wrap. Place it in the refrigerator for about 30 minutes. This helps firm up the mixture, making it easier to shape.
Forming the Truffles
After chilling, take the dough from the fridge. Use a tablespoon or a cookie scoop to take portions of the dough. Roll these portions into uniform balls, about 1 inch in diameter. Arrange your truffles on a baking sheet lined with parchment paper. This keeps them from sticking.
Melting the Chocolate
Next, it’s time to melt the chocolate. In a microwave-safe bowl, combine 1/2 cup of chocolate chips with 1 tablespoon of coconut oil. Microwave this mixture on medium heat in 20-second intervals. Stir well between each interval. Keep going until the chocolate is completely melted and smooth. The consistency should be fluid but not too runny.
Coating the Truffles
Now, dip your truffles in the melted chocolate. Use a fork or your fingers to fully coat each truffle. Lift them out and shake off any excess chocolate. If you want, roll the chocolate-coated truffles in crushed gingerbread cookies for extra flavor and a festive look.
Setting the Chocolate
Let the chocolate set after coating. Allow the truffles to sit at room temperature for about 30 minutes. If you want a quicker method, place them in the refrigerator for about 10 to 15 minutes. This helps the chocolate harden nicely.
Tips & Tricks
Ensuring Perfectly Smooth Truffles
Mixing well is key to smooth truffles. If you do not mix enough, dry bits may form. Use a spatula or your hands to blend all the ingredients fully. Check for any crumbs or lumps before rolling. If you spot dry bits, keep mixing until the dough is smooth. This step helps create a nice texture.
Best Chocolate for Coating
You can choose between dark or milk chocolate for coating. Dark chocolate has a rich flavor. Milk chocolate is sweeter and creamier. I recommend using high-quality brands like Ghirardelli or Callebaut. These chocolates melt smoothly and coat the truffles well. The right chocolate makes a big difference in taste.
Troubleshooting Common Issues
If your dough is too sticky, chill it longer in the fridge. This will help firm it up. If the chocolate won’t melt, make sure to microwave it in short bursts. Stir between intervals to avoid burning. Add a little coconut oil to help it melt smoothly. These tips will keep your truffles looking and tasting great!
Pro Tips
- Chill the Dough: Chilling the dough for at least 30 minutes makes it easier to roll into truffles, ensuring a uniform shape.
- Choose the Right Chocolate: Use high-quality chocolate for coating to enhance the flavor of the truffles.
- Experiment with Flavors: Feel free to add your favorite spices or extracts to the dough for a unique twist on traditional gingerbread.
- Storage Tips: Store the truffles in an airtight container in the refrigerator for up to a week for optimal freshness.
Variations
Different Flavor Options
You can make your truffles even more fun by trying new flavors. Adding peppermint extract gives a refreshing minty twist. Just a few drops will do the trick. Mix it into your dough and enjoy that cool, festive taste.
Another great option is to incorporate orange zest. This adds a bright, citrusy kick that pairs well with the spices. Grate the zest of one orange and fold it into the dough. The result is a vibrant burst of flavor that wakes up your taste buds.
Healthier Alternatives
If you want a lighter version, consider using low-fat cream cheese. This keeps the creamy texture but cuts down on fat. You won’t lose any taste, and you can enjoy these truffles guilt-free.
You can also substitute sugar with a sweetener. Options like stevia or monk fruit work well. Just make sure to adjust the amount based on the sweetness level of your chosen sweetener. This simple swap can make your treats healthier without sacrificing flavor.
Presentation Ideas
Presentation makes your truffles even more special. You can decorate them with sprinkles or edible glitter. This adds fun colors and a festive touch. Use holiday-themed sprinkles for a cheerful look that impresses guests.
Creating themed presentations for different holidays is also a great idea. For example, use red and green sprinkles for Christmas. You can even arrange the truffles in a decorative box or on a festive platter. This thoughtful touch makes your treats stand out and adds to the holiday spirit.
Storage Info
Best Practices for Storing Truffles
To keep your no-bake gingerbread truffles fresh, store them in a cool place. The best temperature is between 60°F and 70°F. Avoid humid areas, as moisture can ruin their texture.
Use airtight containers to store your truffles. This prevents them from drying out and keeps them safe from strong odors. You can layer parchment paper between truffles to avoid sticking.
Freezing Truffles for Later
You can freeze these truffles for later enjoyment. To freeze, place them on a baking sheet first. This will help them keep their shape. Once frozen, transfer them to an airtight container.
When you want to enjoy them again, let them thaw in the refrigerator. This keeps them from melting too fast. They stay fresh for up to three months in the freezer.
Shelf Life of No-Bake Gingerbread Truffles
For the best taste, eat your truffles within a week. They taste best when fresh. After one week, you may notice a change in flavor and texture.
Signs that your truffles have gone bad include a strange smell or mold. If they feel hard or dry, it’s best to toss them. Always check before enjoying your treats!
FAQs
Can I use different types of cookies for this recipe?
Yes, you can! If you want to try a twist, use other cookies. For example, chocolate cookies or even vanilla wafers work well. Just crush them finely, like gingerbread. You may need to adjust spices to match the cookie flavor.
How long do No-Bake Gingerbread Truffles last?
These truffles can last about one week in the fridge. Store them in an airtight container to keep them fresh. If you want to enjoy them longer, freeze them. They can last for up to three months in the freezer.
Can I make these truffles ahead of time?
Absolutely! You can make these truffles a few days before your event. Just follow the steps, then store them in the fridge. They taste great after chilling, and they save you time on busy days.
What can I use instead of cream cheese?
If you prefer a dairy-free option, try using vegan cream cheese. Silken tofu is another great choice. Blend it until smooth to get the right texture. You can also use cashew cream for a creamy taste.
How do I make my truffles more festive?
To add some flair, roll the truffles in crushed candy canes or colorful sprinkles. You can also drizzle white chocolate on top. For a fun twist, use different chocolate coatings, like dark or milk chocolate. Present them in a pretty box for gifts!
No-bake gingerbread truffles are easy and fun to make. You combine simple ingredients like crushed gingerbread cookies and cream cheese. With the right spices and coatings, you create unique flavors. Remember to chill the mixture and coat with chocolate for the best texture. Use variations to suit your taste or event. Store them properly to keep them fresh. These truffles are sure to impress everyone. Enjoy your tasty creations and share them with friend