If you love sweet treats, you’ll adore this Maple Walnut Fudge recipe. This rich and creamy delight hits all the right notes. I’ll guide you through simple steps to make fudge that melts in your mouth. With tips to avoid common mistakes, you’ll create the perfect texture every time. Plus, I’ll share fun variations and storage tips. Let’s dive in and make something special together!
Why I Love This Recipe
- Deliciously Sweet: The combination of maple syrup and walnuts creates a rich, indulgent flavor that is simply irresistible.
- Easy to Make: This fudge requires minimal ingredients and straightforward steps, making it perfect for both novice and experienced bakers.
- Perfect for Sharing: Cut into squares, this fudge is ideal for gifting or serving at gatherings, bringing joy to everyone who tries it.
- Versatile Treat: Customize your fudge by adding different nuts or chocolate, allowing you to make it your own with ease.
Ingredients
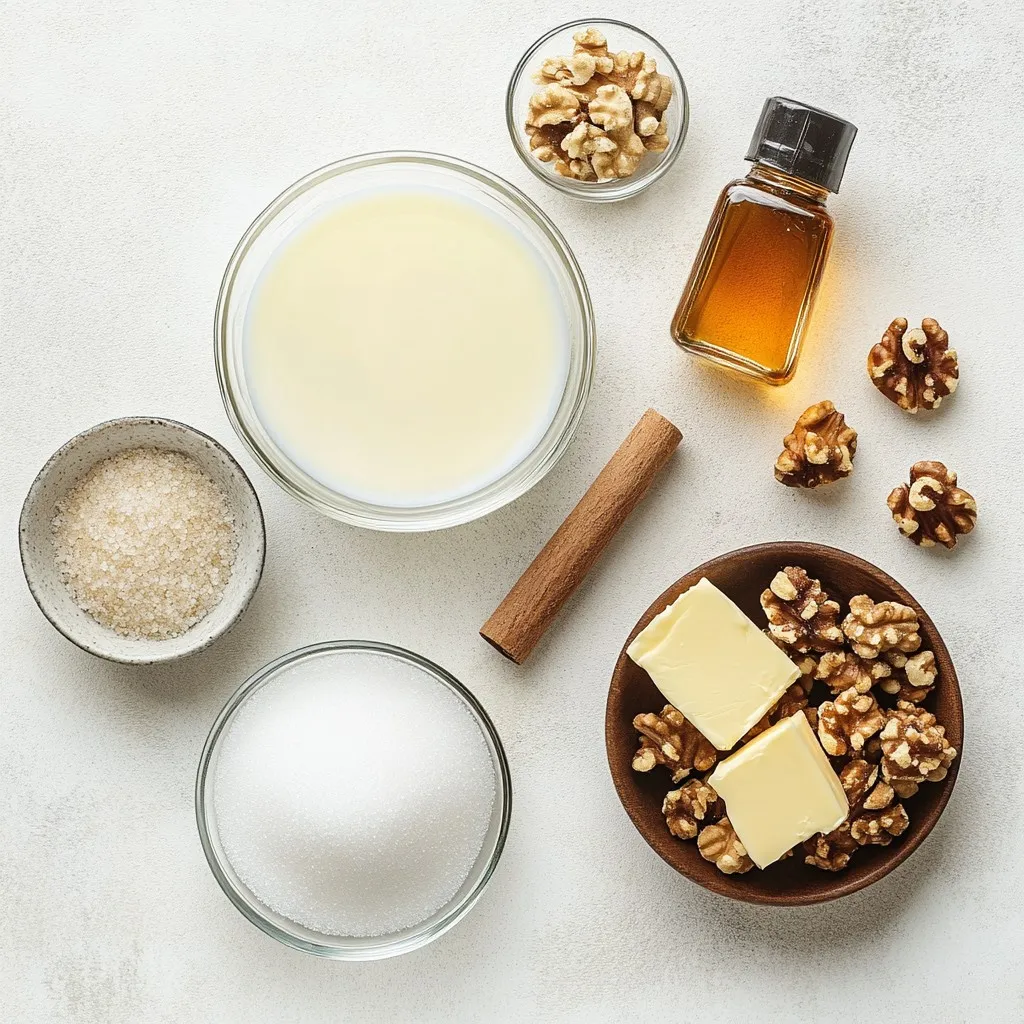
List of Ingredients
– 2 cups granulated sugar
– 1 cup unsweetened almond milk (or regular milk)
– 1/4 cup unsalted butter (cut into small cubes)
– 1/4 cup pure maple syrup
– 1 teaspoon vanilla extract
– 2 cups chopped walnuts (lightly toasted for enhanced flavor)
– 1/4 teaspoon salt
Alternative Ingredients
If you want a dairy-free fudge, use almond milk. You can also try coconut milk for a unique twist. For a nut-free version, replace walnuts with sunflower seeds.
Ingredient Notes
Real maple syrup gives the fudge a rich taste. It has antioxidants and supports local farmers. Using unsalted butter allows you to control the salt level. Toasting walnuts makes them crunchy and brings out their flavor.
Step-by-Step Instructions
Preparation of the Baking Dish
Start by lining an 8×8 inch square baking dish with parchment paper. Make sure there is some overhang on the sides. This will help you lift the fudge out easily once it sets.
Cooking the Fudge Mixture
In a medium saucepan, add the following ingredients:
– 2 cups granulated sugar
– 1 cup unsweetened almond milk (or regular milk)
– 1/4 cup unsalted butter, cut into small cubes
– 1/4 cup pure maple syrup
– 1/4 teaspoon salt
Stir everything together well. Place the saucepan over medium heat. Bring the mixture to a gentle boil, stirring constantly. This ensures the sugar dissolves fully. When it reaches a rolling boil, stop stirring. Let it boil undisturbed for about 5-7 minutes. Use a candy thermometer to check for the soft-ball stage at around 235°F (113°C).
Techniques for Beating the Fudge
Once the mixture reaches the right temperature, remove it from the heat. Let it cool for a few minutes without stirring. Wait until it is about 150°F (65°C). Now, it’s time to add the walnuts and vanilla extract. Stir in:
– 2 cups chopped walnuts (lightly toasted)
– 1 teaspoon vanilla extract
Next, grab a wooden spoon or a sturdy spatula. Vigorously beat the mixture for about 5-10 minutes. Keep going until it thickens and loses its glossy shine. This step is key for getting the right fudge texture.
Setting and Cutting the Fudge
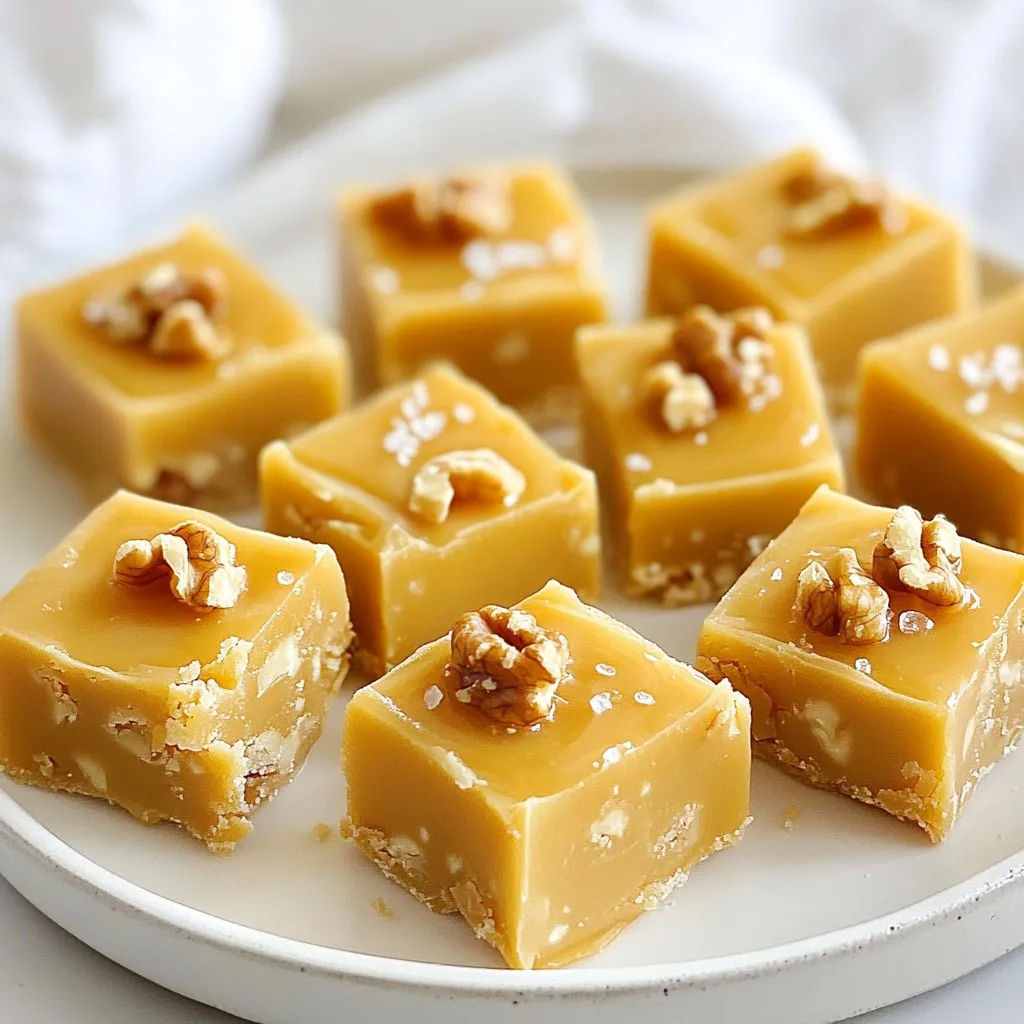
Now, pour the thickened fudge mixture into your prepared baking dish. Use a spatula to smooth the top. Allow the fudge to cool at room temperature for at least 2 hours. It should be firm to the touch when set. Once it is ready, lift the fudge out using the parchment overhang. Cut it into squares and enjoy your delicious homemade treat!
Tips & Tricks
Common Mistakes to Avoid
When making maple walnut fudge, some mistakes can ruin your treat. Here are a few to watch out for:
– Not measuring ingredients: Use precise amounts for best results.
– Skipping the candy thermometer: This tool helps you know the right cooking temperature.
– Stirring during boiling: Stop stirring once it boils. This helps the fudge set properly.
How to Achieve the Perfect Fudge Texture
To get that rich, creamy fudge texture, follow these tips:
– Cook to the right temperature: Aim for 235°F (113°C) at the soft-ball stage.
– Let it cool: Allow the mixture to cool before adding walnuts and vanilla.
– Beat the fudge well: Stir vigorously until it thickens and loses gloss, about 5-10 minutes.
Presentation Tips
A beautiful presentation makes your fudge even more appealing. Try these ideas:
– Dust with salt: A light sprinkle adds flavor and contrast.
– Drizzle with maple syrup: This adds sweetness and a shiny finish.
– Use a decorative platter: Place the fudge squares on a nice dish for an eye-catching display.
Pro Tips
- Use a Candy Thermometer: For perfect results, use a candy thermometer to ensure your fudge reaches the soft-ball stage at 235°F (113°C). This step is crucial for achieving the right texture.
- Toast the Walnuts: Lightly toasting the walnuts enhances their flavor and adds a delightful crunch to your fudge. Simply spread them on a baking sheet and bake at 350°F (175°C) for about 5-7 minutes.
- Don’t Rush the Cooling: Allow the fudge to cool at room temperature for at least 2 hours. Rushing this step can lead to a softer texture that doesn’t set properly.
- Experiment with Flavors: Feel free to customize your fudge by adding different mix-ins or flavorings, such as chocolate chips, dried fruit, or even a touch of sea salt for an extra flavor boost!
Variations
Vegan Maple Walnut Fudge Recipe
To make this fudge vegan, swap the butter for coconut oil. Use almond milk, as it adds a nice flavor. The rest of the ingredients stay the same. Follow the same steps, and you will create a rich treat. This fudge will be creamy and delightful without any dairy.
Gluten-Free Options
This fudge recipe is naturally gluten-free. All the ingredients, including the sugar and nuts, work well for gluten-free diets. Just ensure the chocolate or any added mix-ins are also gluten-free. This means you can enjoy fudge without worrying about gluten.
Other Flavor Combos
You can add a twist to your fudge. Try mixing in chocolate chips for a chocolate-maple fudge. This adds a sweet richness. You could also use pecans instead of walnuts for a different nutty flavor. Adding a pinch of sea salt on top makes the flavors pop even more. The sky is the limit here!
Storage Info
How to Store Maple Walnut Fudge
Store your maple walnut fudge in an airtight container. This keeps it fresh and moist. Place a piece of parchment paper between layers if stacking. This helps prevent sticking. Make sure to keep the fudge at room temperature in a cool, dry place.
Shelf Life and Freezing Tips
When stored properly, the fudge lasts about two weeks. If you want to keep it longer, freezing is a great option. Wrap the fudge tightly in plastic wrap. Then, place it in a freezer-safe container or bag. It can stay frozen for up to three months. Thaw it in the fridge overnight when ready to enjoy.
Reheating and Serving Suggestions
You don’t need to reheat fudge, but you can warm it slightly. This makes it softer and easier to cut. Just place it in the microwave for a few seconds. Serve the fudge at room temperature for the best taste. Pair it with coffee or tea for a delightful treat.
FAQs
What is the best way to ensure fudge sets properly?
To help your fudge set well, use a candy thermometer. This tool ensures you cook the fudge to the right temperature. The ideal temperature is about 235°F (113°C). Also, let it cool to around 150°F (65°C) before mixing in the nuts and vanilla. This cooling step is key for that perfect texture.
Can I substitute ingredients in this recipe?
Yes, you can make a few swaps. For a dairy-free option, use almond milk instead of regular milk. You can also replace unsalted butter with coconut oil for a vegan choice. If you want a nut-free version, skip the walnuts or use seeds like sunflower seeds.
How do I know when the fudge has reached the soft-ball stage?
You can test the soft-ball stage by using a candy thermometer. When it reads 235°F (113°C), it’s ready. If you don’t have a thermometer, drop a small spoonful of fudge into cold water. It should form a soft ball that holds its shape but flattens when pressed.
What are common uses for leftover maple walnut fudge?
Leftover fudge is great for snacks or desserts. You can chop it up and mix it into ice cream for a tasty treat. You can also use it to top brownies or cakes. If you want something different, try adding it to oatmeal or yogurt for extra flavor.
Making maple walnut fudge is fun and easy. You learned about ingredients, steps, and tasty variations. Use real maple syrup for better flavor. Follow the tips to avoid mistakes and enhance texture. Proper storage keeps your fudge fresh and tasty. Always try new flavors for exciting treats. Enjoy your fudge adventures and share your creation