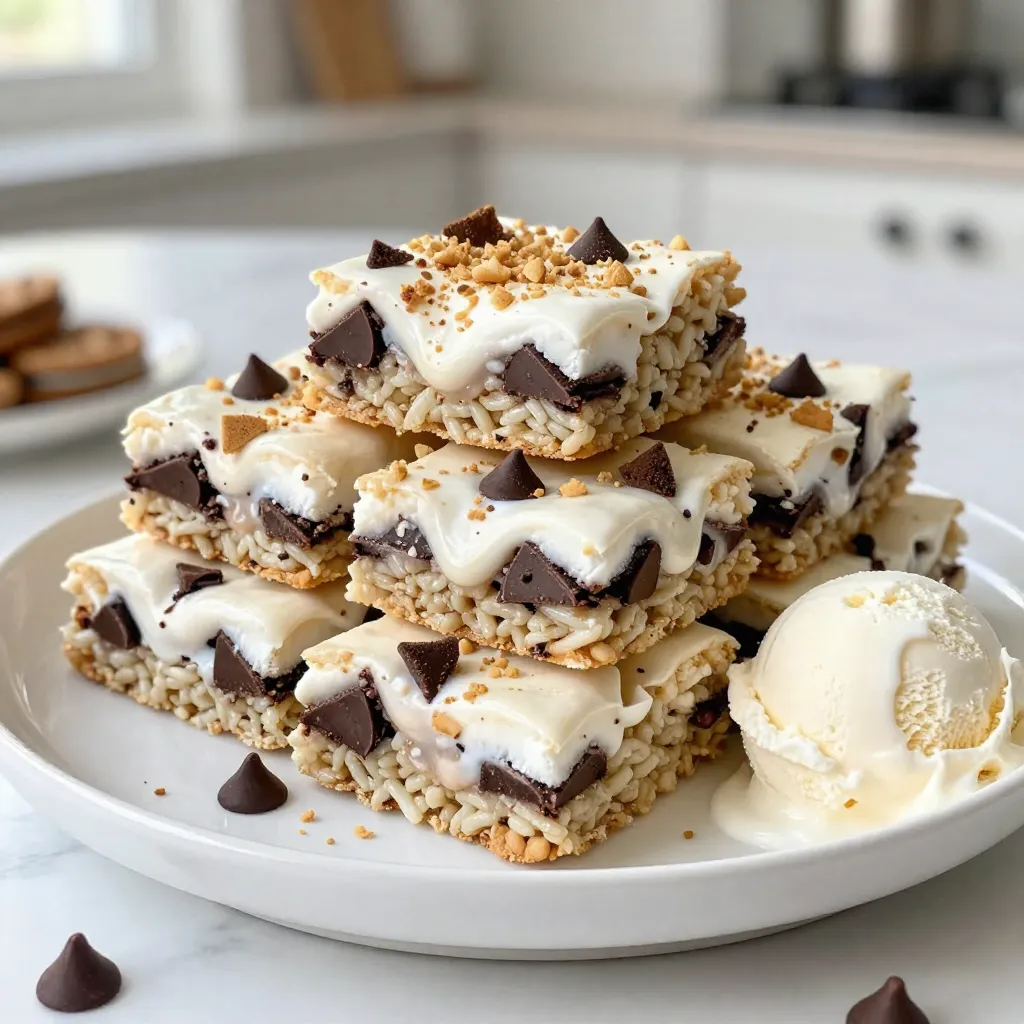
If you’re craving a tasty treat, let me introduce you to Cookies & Cream Rice Krispie Treats! This simple delight combines crispy cereal with creamy marshmallows and crushed cookies. I promise, making these treats is easy and super fun. Whether you need a quick dessert for a gathering or just a sweet snack for yourself, this recipe is perfect. Let’s dive into the ingredients and get started on this yummy adventure!
Why I Love This Recipe
- Quick and Easy: This recipe comes together in just 30 minutes, making it perfect for last-minute gatherings or a sweet treat after dinner.
- Deliciously Indulgent: The combination of marshmallows, Rice Krispies, and crushed cookies creates a rich flavor that is hard to resist.
- Customizable: You can easily switch up the types of cookies or chocolate chips to create your own unique version of these treats.
- Fun for All Ages: These Rice Krispie treats are a hit with both kids and adults, making them a great dessert for family gatherings or parties.
Ingredients
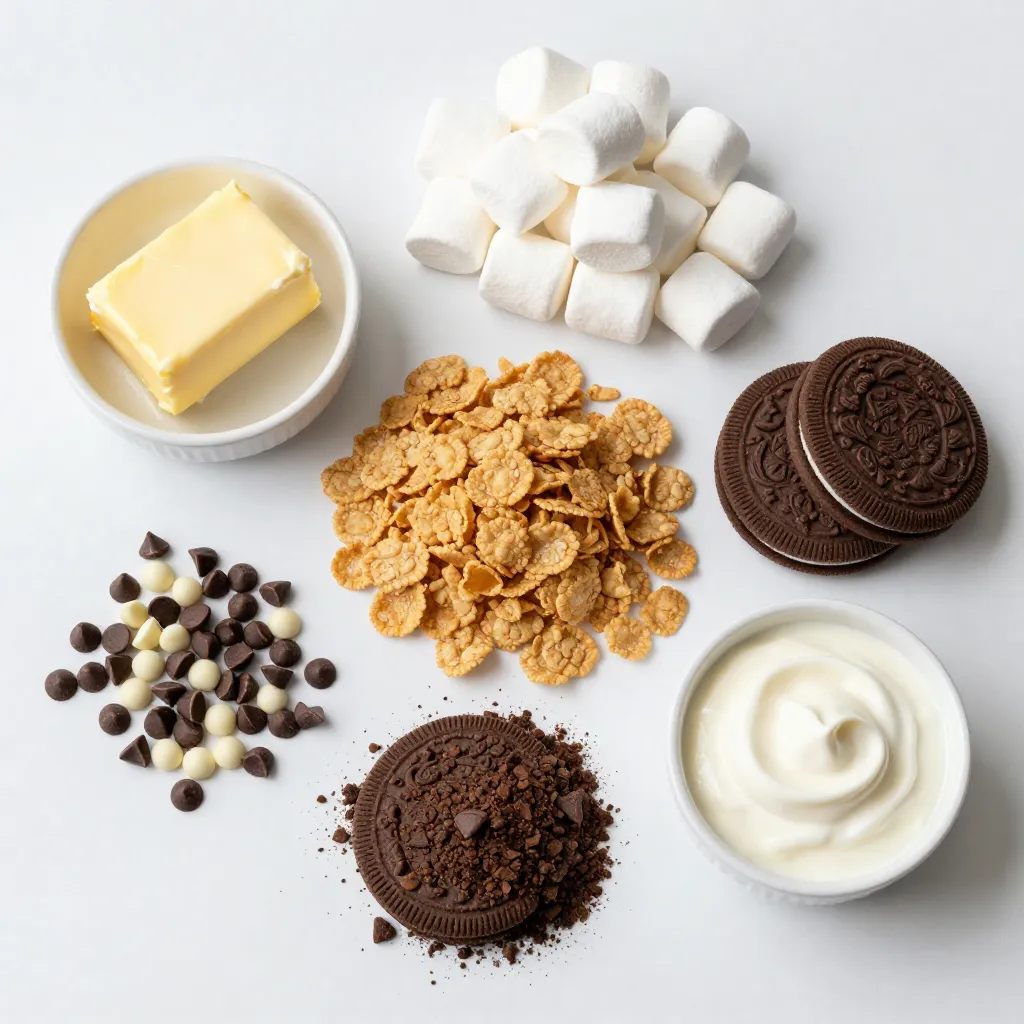
List of Ingredients for Cookies & Cream Rice Krispie Treats
– 3 tablespoons unsalted butter
– 1 bag (10 oz) mini marshmallows
– 6 cups Rice Krispie cereal
– 1 cup crushed chocolate sandwich cookies (such as Oreos)
– 1/2 cup chocolate chips (white or dark)
– 1/4 cup heavy cream
To make these Cookies & Cream Rice Krispie Treats, you need simple and delicious ingredients. The unsalted butter adds richness, while mini marshmallows bring sweetness and gooeyness. Rice Krispie cereal gives that classic crunch.
Crushed chocolate sandwich cookies provide the cookies and cream flavor you love. The chocolate chips add extra chocolatey goodness. Finally, heavy cream helps create a creamy texture that binds everything together.
Each ingredient plays a vital role. Together, they create a treat that is rich, sweet, and incredibly satisfying. Grab these ingredients and get ready to make a delightful snack!
Step-by-Step Instructions
Preparation Steps for Cookies & Cream Rice Krispie Treats
– Step 1: Prepare the Baking Dish
Start by greasing a 9×13 inch baking dish. You can use butter or parchment paper. This step helps the treats come out easily.
– Step 2: Melt the Butter
In a large saucepan over medium-low heat, add 3 tablespoons of unsalted butter. Stir it until it melts completely.
– Step 3: Add Marshmallows and Stir
Once the butter melts, add a bag of mini marshmallows. Keep stirring until they melt and become smooth.
– Step 4: Mix in Rice Krispie Cereal
After the marshmallows melt, remove the pan from heat. Gradually stir in 6 cups of Rice Krispie cereal. Make sure all pieces are coated.
– Step 5: Incorporate Crushed Cookies
Carefully fold in 1 cup of crushed chocolate sandwich cookies. This adds that yummy cookies and cream flavor.
– Step 6: Add Chocolate Chips and Heavy Cream
Pour in 1/2 cup of chocolate chips and 1/4 cup of heavy cream. Stir quickly to create a marbled look without mixing too much.
– Step 7: Transfer the Mixture to the Pan
Pour the mixture into your prepared baking dish. Use a spatula or moistened hands to press it down evenly.
– Step 8: Cool and Cut
Let the treats cool completely at room temperature. Once set, cut them into squares or rectangles for serving.
These steps create a fun treat that is easy to enjoy. You can also add your own twist to these.
Tips & Tricks
Key Tips for Perfect Rice Krispie Treats
How to Achieve the Right Consistency
To get the perfect Rice Krispie treats, you need to melt the butter and marshmallows well. Heat them slowly on medium-low. Stir until smooth. If the mixture is too dry, add a splash of heavy cream. This keeps your treats soft and chewy.
Tips for Easier Cleanup
Cleanup can be a breeze. Grease your pan with butter or line it with parchment paper. This ensures your treats do not stick. Use a spatula to scrape the saucepan. If you wet your hands slightly, you can press the mixture into the pan without it sticking to you.
Storage Tips for Freshness
Store your treats in an airtight container. This keeps them fresh and soft. They will last for up to a week. If you want to keep them longer, freeze them. Just wrap them well in plastic wrap and foil. When you’re ready to eat, let them thaw at room temperature.
Pro Tips
- Butter Alternatives: If you want a richer flavor, consider using coconut oil or flavored butter instead of unsalted butter.
- Cookie Variations: Experiment with different types of cookies, such as peanut butter or double chocolate, to create unique flavor combinations.
- Storage Tips: Store your Rice Krispie treats in an airtight container at room temperature to keep them fresh and chewy for several days.
- Decorative Touch: Drizzle melted chocolate over the top of the treats before cutting for an eye-catching finish.
Variations
Creative Variations on Cookies & Cream Rice Krispie Treats
You can easily mix things up with Cookies & Cream Rice Krispie Treats. Here are a few fun ideas to try:
– Add Peanut Butter for Richness
Stir in some peanut butter when you melt the butter. This step adds a rich, nutty flavor. It pairs well with chocolate and cookies. You’ll get a creamy, delightful treat each time.
– Use Different Flavored Marshmallows
Try flavored marshmallows like strawberry or vanilla. These will change the taste and look of your treats. The colors and flavors can make them more fun for kids and adults alike.
– Incorporate Nutella or Other Chocolate Spreads
Swirl in Nutella or any chocolate spread after adding the chocolate chips. This adds an extra layer of chocolatey goodness. It also gives the treats a beautiful marbled effect.
These simple tweaks elevate your treats. They make your kitchen adventures even more enjoyable. Feel free to experiment and find your favorite mix!
Storage Info
Best Practices for Storing Cookies & Cream Rice Krispie Treats
How do I store cookies and cream Rice Krispie treats?
Store them in an airtight container. This keeps them fresh and tasty. Place a piece of parchment paper between layers to prevent sticking.
How do I freeze them?
To freeze, cut the treats into squares. Wrap each piece in plastic wrap. Then, place them in a freezer-safe bag. They can last up to three months in the freezer.
How do I reheat leftovers?
To reheat, place a treat in the microwave for about 10-15 seconds. This warms it up and makes it soft again. Avoid overheating, as it can make the treat hard.
These simple steps help keep your cookies and cream Rice Krispie treats fresh and delicious!
FAQs
Common Questions About Making Cookies & Cream Rice Krispie Treats
Can I use regular marshmallows instead of mini?
Yes, you can. Regular marshmallows will work just fine. Just cut them into smaller pieces for easier melting.
How long do the Rice Krispie Treats last?
These treats last about a week when stored in an airtight container. They stay soft and tasty.
Can I substitute the Rice Krispie cereal with another type?
You can use other cereals. Just make sure they are crunchy and light. Choices like Cocoa Pebbles or Corn Pops can work well.
What if my mixture is too sticky?
If your mixture is too sticky, you can add more Rice Krispie cereal. Just mix it in slowly until it reaches the right texture.
How can I customize the flavor further?
You can add flavors like peanut butter or flavored marshmallows. Try mixing in nuts, candies, or even a drizzle of caramel for fun.
These Cookies & Cream Rice Krispie Treats are fun and easy to make. We covered the ingredients, steps, tips, and storage info to help you succeed. Try the creative variations to make them your own! Remember, you can adjust the flavors and add new treats. Have fun in the kitchen and enjoy your tasty creations. Simple steps lead to great result