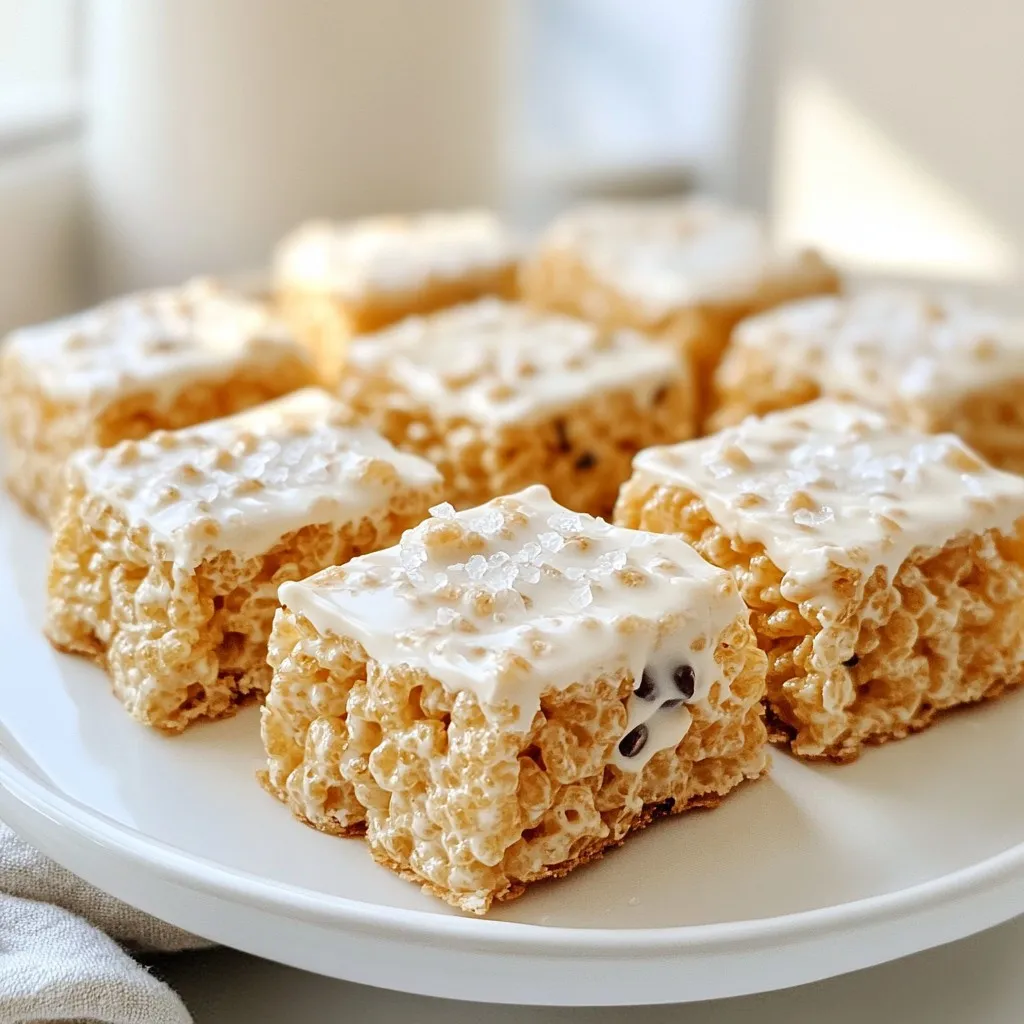
If you want a snack that’s both easy to make and full of flavor, try my Brown Butter Rice Krispie Treats! This twist on a classic uses brown butter for a rich, nutty flavor that takes these treats to the next level. With just a few simple ingredients, you can create a delightful treat that’s perfect for any occasion. Ready to make your kitchen smell amazing? Let’s dive in!
Why I Love This Recipe
- Irresistibly Nutty Flavor: The brown butter adds a rich and nutty undertone that elevates the classic Rice Krispie treat to a whole new level of deliciousness.
- Quick and Easy Preparation: This recipe takes only 10 minutes of prep time, making it perfect for a last-minute treat or a fun cooking activity with kids.
- Customizable Indulgence: With the option to add dark chocolate chips, you can personalize these treats to suit your taste or impress your guests.
- Perfect for Any Occasion: Whether it’s a party, a picnic, or just a cozy night in, these treats are sure to bring smiles and satisfaction to everyone.
Ingredients
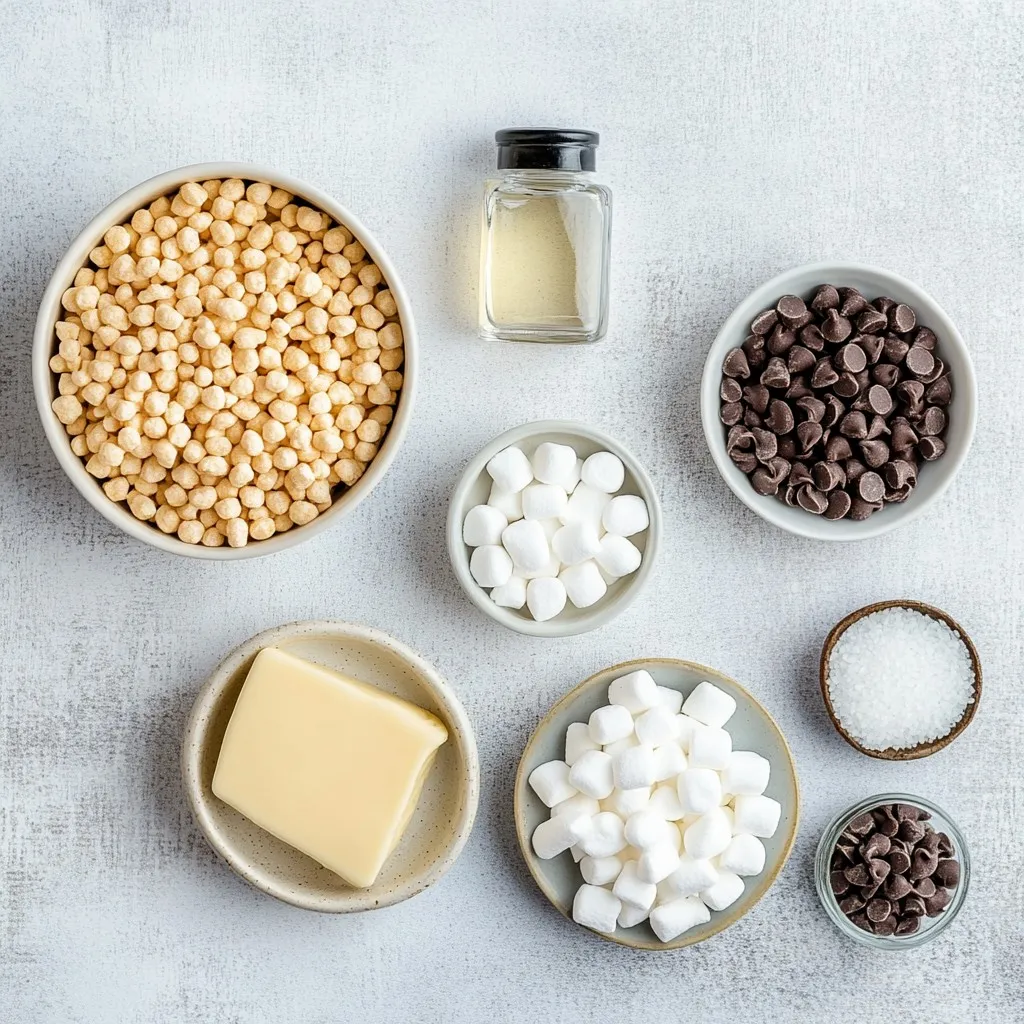
To make Brown Butter Rice Krispie Treats, you need simple ingredients that blend to create magic. Here’s what you’ll need:
– 4 tablespoons unsalted butter
– 1 package (10 oz) mini marshmallows
– 6 cups Rice Krispies cereal
– 1 teaspoon vanilla extract
– 1/4 teaspoon sea salt
– 1/2 cup dark chocolate chips (optional)
Each ingredient plays a special role. The unsalted butter adds rich flavor and helps create that tasty brown butter. Mini marshmallows melt perfectly and bind everything together. Rice Krispies give the treats their signature crunch. Vanilla adds warmth, while sea salt balances the sweetness. Dark chocolate chips can enhance the flavor and add a touch of indulgence.
You can find all these ingredients at your local grocery store. Make sure to check your pantry for any you might already have. Using fresh ingredients makes a big difference in taste and texture.
Step-by-Step Instructions
Step-by-Step Guide
Melting the Unsalted Butter
Start by placing a large saucepan on medium heat. Add 4 tablespoons of unsalted butter. Stir it often as it melts. The butter will foam and change color. Keep stirring until it becomes a rich golden brown. This takes about 5-7 minutes. You will smell a nutty aroma when it’s ready. Remove the pan from heat to stop it from burning.
Melting the Mini Marshmallows
Next, add a 10 oz package of mini marshmallows to the browned butter. Stir constantly for about 2-3 minutes. The marshmallows will melt and blend into a smooth mixture. It’s important to keep stirring so they don’t stick or burn.
Combining Ingredients and Folding in Rice Krispies
After melting the marshmallows, mix in 1 teaspoon of vanilla extract and 1/4 teaspoon of sea salt. Stir well to combine. Now it’s time to add the Rice Krispies. Gradually fold in 6 cups of Rice Krispies cereal. Do this gently to keep the cereal crunchy. If you want to add a fun twist, fold in 1/2 cup of dark chocolate chips.
Now you have a gooey and delicious mixture ready to set into treats!
Tips & Tricks
Tips for Working with Brown Butter
How to Know When Brown Butter is Ready
Brown butter is done when it turns a rich, golden brown color. You will see tiny brown specks forming at the bottom of the pan. You will also smell a nutty aroma. This usually takes about 5-7 minutes over medium heat. Make sure to stir often to avoid burning.
Preventing Bitter Flavor
To avoid a bitter taste, watch the butter closely as it cooks. As soon as it changes color and smells nutty, take it off the heat. If you leave it too long, it will burn and taste bad. Always remember that it continues to cook even after you remove it from the heat.
Achieving the Perfect Consistency
To get the right texture, keep stirring the butter while it cooks. This helps the heat spread evenly. When you mix the melted marshmallows with the brown butter, stir until smooth. This smooth mixture will coat the Rice Krispies well.
Presentation Tips
Elevating Visual Appeal
To make your treats stand out, serve them on a colorful plate. You can also use a rustic wooden board for a nice touch. Drizzling melted chocolate on top adds a nice look and taste. A sprinkle of sea salt on the finished treats can make them pop!
Serving Suggestions
Serve these treats at parties or as a fun snack. You can cut them into squares or rectangles. For a twist, stack a few treats high on a plate for a fun display.
Custom Topping Ideas
Get creative with toppings! You can use crushed nuts, sprinkles, or even dried fruit. If you love chocolate, try adding chocolate chips or a drizzle of caramel. These simple extras can turn your treats into something special.
Pro Tips
- Watch the Butter: Keep a close eye on the butter as it melts. The transition from melted to browned happens quickly, so stir constantly to achieve the perfect nutty flavor without burning.
- Use Fresh Ingredients: Ensure your marshmallows and Rice Krispies cereal are fresh for the best taste and texture. Stale ingredients can lead to chewy or hard treats.
- Cool Before Cutting: Let the treats cool completely before cutting them into squares. This helps them firm up and makes slicing easier without crumbling.
- Experiment with Mix-Ins: Feel free to customize your treats with different mix-ins like nuts, dried fruit, or various types of chocolate for a unique twist on the classic recipe.
Variations
Flavor Variations
Adding Peanut Butter
You can make these treats even better by adding peanut butter. Mix in 1/2 cup of creamy peanut butter when you melt the marshmallows. This gives a rich, nutty flavor that pairs great with brown butter.
Incorporating Other Mix-ins
Feel free to get creative! Add chopped nuts, mini candies, or dried fruit. About 1/2 cup of any mix-in works well. Just fold them in after adding the Rice Krispies.
Alternative Sweeteners
For a different taste, try using honey or maple syrup instead of marshmallows. Use about 1 cup of your chosen sweetener. Just heat it with the brown butter until it’s smooth. Then add the Rice Krispies as usual.
Dietary Variations
Gluten-Free Options
To make these treats gluten-free, ensure you use gluten-free Rice Krispies. Most brands offer gluten-free options that taste just as good.
Vegan Substitutes
You can create vegan Brown Butter Rice Krispie Treats by using vegan butter and marshmallows. They will still hold their shape and have a great taste.
Reduced Sugar Options
For a lower sugar treat, use less marshmallow. Use about 1/2 of the package. You can also add more Rice Krispies. This keeps the treats tasty while cutting down on sugar.
Storage Info
How to Store Brown Butter Rice Krispie Treats
Optimal Storage Conditions
To keep your Brown Butter Rice Krispie Treats fresh, place them in an airtight container. Make sure to store them at room temperature. If your kitchen is hot and humid, consider putting them in the fridge. This will help them stay firm. Just remember, cold treats can become hard.
Shelf Life Information
When stored properly, these treats last about 3-5 days. If you notice them getting stale, you can revive them slightly by microwaving for a few seconds. They won’t be as fresh as day one, but they will still taste good!
Reheating Tips
Keeping Them Soft and Chewy
To keep your treats soft, use the microwave. Place a treat on a microwave-safe plate. Heat it for 5-10 seconds. This quick burst of heat will make them warm and gooey again.
Best Practices for Reheating
Avoid using the oven for reheating. It can dry them out. If you need to reheat a batch, cover them with a damp paper towel in the microwave. This keeps the moisture in and helps maintain their chewy texture.
FAQs
Can I use regular butter instead of unsalted butter?
Yes, you can use regular butter. Unsalted butter lets you control the salt in your treats. If you use salted butter, reduce the added salt in the recipe. This keeps your treats from being too salty.
How can I make my Rice Krispie treats softer?
To make softer treats, use more marshmallows. You can also add a little more butter. Mixing in a splash of milk can help too. Just be careful not to use too much, or they might become too gooey.
How long do these treats last?
These treats will last about 3 days at room temperature. Store them in an airtight container. If you keep them in a cool, dry place, they stay fresh longer.
Can I freeze Brown Butter Rice Krispie Treats?
Yes, you can freeze them! Wrap the treats tightly in plastic wrap and place them in a freezer-safe bag. They can last for about 2 months in the freezer. To enjoy, let them thaw at room temperature.
Making Brown Butter Rice Krispie Treats is fun and easy. We covered key ingredients like unsalted butter, mini marshmallows, and optional dark chocolate chips. I shared step-by-step instructions to melt, combine, and fold ingredients.
Don’t forget my tips for achieving perfect brown butter and enhancing looks. Explore flavor and dietary variations to fit everyone’s needs. Proper storage ensures your treats stay fresh longer.
Now, you can serve up joy with these treats that everyone love